05 January 2025

Problem: "Toshiba Satellite A300" shuts-down hard during boot-up.

Problem with "Toshiba Satellite A300". Shuts down hard during bootup.

  • Some extra details:
Bios  1.70 of 11/24/2008
Ram 3GB
Satellite A300 PSAGCE-0c500wce

  • Problem:
As of 2025, the battery completely died more than a year ago.
With or without it inserted, the computer boots up, but right after the Windows logo appears, it shuts-down, consistently.


  • Some troubleshooting:
If I enter in the BIOS, I can stay there, change settings, and the computer runs fine.

I tried to boot up from some linux-live-usb distributions. I was surprised to see that with some it would work, with others the same problem would appear.

This would happen with and without the HD attached to the computer. I thought the HD could be causing the failure.

I narrowed it down to the boot parameter  "acpi=off". With it in the kernel parameters of the boot process, the linux would boot up without problems.


  • My guess:
When Windows/Linux tried to communicate with the BIOS to get ACPI information, whatever the 'dead-or-missing-battery' was responding/not-responding was causing the computer to shut-down.

Maybe it was not designed-and-tested to work with no battery.

Maybe this problem is fixed with a BIOS update (it has never been updated on that laptop), however there is a problem... Toshiba website and support for this model is gone. There are BIOS updates out there, but not from Toshiba. So you either play the cards or not.

  • Workaround
Knowing how to successfully boot Linux I looked for a similar way on Windows. It is the "Rescue Mode". Just press F8 repeatedly right after pressing the power-button. It will instruct Windows (W7 I believe it was) to give you a menu and choose what to load.

I returned the laptop to my friend with instructions on how to boot in that way.

  • Misc
Luckily it didn't have any of the many other problems that Model can have (I researched a lot).

I also learnt about about  https://www.hirensbootcd.org

It is like a Linux-live-usb but with Windows. Unfortunately I didn't find the way to prevent it from talking to the ACPI so within seconds/minutes of booting it would cause the shutdown. But it is good to know it is there if you need to update the BIOS and you require a Windows for that (because the vendor gives you a .exe ) and you don't have a Windows around.

Hope it helps others.

29 October 2023

Using VSCode Server + VScode (just Editor) [ On Linux Server ]


VSCode: Visual Studio Code.

I have been reading and reading about the 'Server', but the information seemed conflicting.

For example, here [1] they mention the Server, but they don't say how to install it or where to get it.

[1] https://code.visualstudio.com/docs/remote/remote-overview

Then there is this [2] which talks about 'run vscode anywhere and access it in the browser'.

[2] https://github.com/coder/code-server

"In the browser" vs. "in VSCode Editor"
Both, one?


Well, [3] says "connect to that remote machine from anywhere through a local VS Code client". Since this comes from the original 'vscode studio' website, it seems the 'Server' I want is meant to be accessed from the VSCode (editor) and not from a Browser.

[3] https://code.visualstudio.com/docs/remote/vscode-server


Good, but how do I install it?

Things started to get clear with
https://code.visualstudio.com/docs/remote/remote-overview
which led me to
https://code.visualstudio.com/docs/remote/ssh

-------------------------------------------------------------------

Solution:
The Server is installed by the Client (the normal VSCode editor) running on the Client/Desktop, who connects via SSH to the Server.


If you already have "A Server, with linux and SSH access configured" you are on the quick and easy track.

Everything you need to do is:

1. In your (let's call it) Desktop PC, install VSCode


2. Install the required extension:

They talk about the Remote Development extension pack, which has 4 components. 


But after careful reading, if your case is like mine (a proper Linux server with SSH setup and keys, etc), you only need the 'Remote SSH', which can be installed individually.


Click on the green corner and then 'Connect to Host'


Once you do that, it will download the Installation package for the Server on the Server and install it. You only have to wait.

While you wait, you can see what is happening on the Server (output from htop )


and that's it!


I have read tons of websites with instructions and configurations...  Most of it is unnecessary, or takes you to other places.

Obviously things change if the Server is on a different network, or doesn't have SSH keys. But if your Server is like in my case, a VM running nearby, the process is actually very simple (once you know how).


Summary:

Server
Linux, with SSH configured


Desktop
Access to Server via SSH verified.
Keys to access the Server already installed/configured.


Actions (on Desktop):
1. Install VSCode
2. Within VSCode: Add the "Remote - SSH" Extension
3. Within VSCode: Connect to Server: This connection will install the server component of VSCode (VSCode Server) on the Server, and connect to it.
4. Now you have a VSCode (client) connected and running/using stuff on the Server.


04 August 2023

Getting the PLC TL-WPA4220 to clone / replicate the Wifi network offered by the router Livebox Fibra from Orange ( create a wifi mesh network)


Hardware Version: TL-WPA4220 5.0
Firmware Version: 1.0.12 Build 230309 Rel.64136n (6985)

and one router, Livebox Fibra from Orange.
Details:
1.1 fabricante Arcadyan
1.2 modelo PRV3399B_B_LT
1.3 operador Orange
1.6 versión middleware AR_LBFIBRA_sp-00.03.05.225D
1.8 modo WAN GPON
1.13 versión de bootloader 1.2.4-ES
1.14 versión de hardware ARLTLBFIB2.0.0


And I wanted to get the 1+2 devices to share the same wifi configuration so I don't jump networks as I move around the house.

The process is simple if you know how.

There are some things that are needed and others may not. As I don't know which are not, I will specify my settings so you can reproduce my configuration if needed.


Configuration on Router Livebox Fibra

I assume you have access to 
Advanced Configuration > Wifi > Enable WPS

This is to enable the button that we will use later on. That button can be enabled / disabled from the web configuration of the router.
It is recommended to have it disabled when you won't be using it (for safety).


Configuration of PLC TL-WPA4220 V5

This is the configuration I had when I got it to work cloning the router Wifi. Other configurations may be possible.

Using the web or the App of TP-Link PLC I got it like this:

Master and 2 slaves: Paired, using the same "Network Name"


Wi-Fi Move is Enabled


Doesn't matter what Wifi SSID you have configured at this point, but it should be the same on both PLC as "wi-fi move" is active.


Action on Router Livebox Fibra

As described in the manual of the router.

6. Wi-Fi:
 Apagado = red Wi-Fi desactivada.
 Verde fijo = red Wi-Fi activada.
Verde parpadeando = emparejamiento WPS activo.
 Azul fijo = red Wi-Fi de invitados activada.
 Azul parpadeando = administración remota temporal (15 min) botón Servicio

When we press the WPS button (number 2) the wifi led will start blinking.


Press it!


Action on PLC TL-WPA4220

With the PLC very close to the router, already paired with the PLC-master and working, press the button located on the LED of Wifi (many people don't know that is also a button).


It will start blinking slowly, and after 20+ seconds or more, blink faster. The Wifi led on the router should be blinking as well.

During this period, the PLC is getting to connect to the Router and clone its wifi configuration (SSID and password).

Note: On the PLCs, originally I had a different SSID than the one on the router, but the same password as the wifi of the router.


Once the process is completed, the Wifi originally advertised by the PLC should disappear and you should only see the wifi SSID of the Livebox router (both, router and PLC are now advertising the same SSID).

Verify that the other PLC has the same configuration (thanks to 'wi-fi Move' ).

Disable the "emparejado por WPS" that we enabled from the web configuration of the Livebox Fibra router.


Congratulations! Now you have 1+2 Access points that belong and act as the same network (which is NOT the same as having just the same SSID / password). You can move around the house without disconnecting from one and connecting to another access point, as the 3 act as one.


Notes:
Before I did this I upgraded the firmware on the PLCs, from one version to the next, in order, up to the last one. 
It is safer that way because it is the way the vendor tests the upgrade process.


I did it because I was hoping to see some way to 'clone' the wifi configuration from the PLC User Interface, but it didn't happen. The UI did not change at all, nor did I get to see the 'mesh' functionality.

Later on I discovered this video, which made me realise that the wifi Led was not only to enable/disable wifi, but also to "clone" a wifi.

Cómo clonar una red WiFi haciendo uso de el PLC TP-Link TL-WPA4220

So now I have:
- The advantages of a powerline network
- The advantages of a mesh network, but at a much lower price.


I hope it helps someone.

15 July 2023

Adding waterfox to profile-sync-daemon

It is not "supported" by default, but it works if you do the following.


# stop service
systemctl --user stop psd
systemctl --user disable psd


# add profile for waterfox

-------------- create a file called waterfox with this content
if [[ -d $HOME/.waterfox ]]; then
    profileArr=( $(grep '[P,p]'ath= $HOME/.waterfox/profiles.ini |
    sed 's/[P,p]ath=//') )
    index=0
    PSNAME="$browser"
    for profileItem in ${profileArr[@]}; do
        if [[ $(echo $profileItem | cut -c1) = "/" ]]; then
            # path is not relative
            DIRArr[index]="$profileItem"
        else
            # we need to append the default path to give a
            # fully qualified path
            DIRArr[index]="$HOME/.waterfox/$profileItem"
        fi
        index=$index+1
    done
fi

check_suffix=1
------------------

drop your profile in /usr/share/psd/browsers/


# verify user settings

~/.config/psd/psd.conf

you should have something similar to 
BROWSERS="waterfox google-chrome"


# enable service

systemctl --user start psd
systemctl --user enable psd


# now you should see waterfox within the profiles covered

$ psd preview
Profile-sync-daemon v6.31 on Debian GNU/Linux 10 (buster)

 Systemd service is currently active.
 Systemd resync-timer is currently active.
 Overlayfs v23 is currently active.

Psd will manage the following per /home/USER/.config/psd/.psd.conf:

 browser/psname:  waterfox/waterfox
 owner/group id:  USER/<blah>
 sync target:     /home/USER/.waterfox/6jebqofr.default
 tmpfs dir:       /run/user/<blah>/USER-waterfox-6jebqofr.default
 profile size:    709M
 overlayfs size:  0
 recovery dirs:   1 <- delete with the c option
  dir path/size:  /home/USER/.waterfox/<blah>.default-backup-crashrecovery-20230624_224855 (692M)

 browser/psname:  google-chrome/chrome
 owner/group id:  USER/<blah>
 sync target:     /home/USER/.config/google-chrome
 tmpfs dir:       /run/user/<blah>/USER-google-chrome
 profile size:    588M
 overlayfs size:  0
 recovery dirs:   1 <- delete with the c option
  dir path/size:  /home/USER/.config/google-chrome-backup-crashrecovery-20230624_224900 (750M)

17 June 2023

Installing Linux on Dell Optiplex 7010 Plus Micro


The machine comes with Windows11 whether you like it or not (well, it depends on the country you buy it).

Officially it is a hardware supported by Ubuntu.

I tested booting with Lubuntu and SparkyLinux. Bluetooth, Wifi, Network works fine.

  • Testing Linux distributions:
You can use different tools to put the iso(s) on a usb stick and boot from them.

Personally I found Rufus the best as it:
- Gives you full control of the settings
- Allows you to do md5sum within the tool (always check the iso right after downloading it)


  • Important note about the BIOS settings as it comes from Dell with Windows11.
Windows11 was installed using this configuration (RAID On). I found that in order to work with Linux, I had to change it to AHCI/NVMe. Remember to change it back to "RAID On" every time you want to boot Windows11.

When booting up:
F2: BIOS setup
F12: One time boot order setup (from here you can also access the BIOS setup)


Disabling "Secure Boot" did not cause any problems to Windows11.


The BIOS has many more settings, but I believe those were the main ones that affected windows / linux bootings.


  • Installing multiple OS in parallel easily.
Either you create or reuse the /boot/efi partition that is already created (with size 350MB  [fat32]).


It is critically important that for each Linux that you install, you mark that partition as "/boot/efi" mountpoint and set the "boot" flag on it (in blue on the photo). The distro will know what to do with it and will install itself alongside the other "distros" there. However, the GRUB menu that you will see will be the one of the "last" OS that you install. All the options/distros will be there, but the look & feel will be the last one.

I say this because I found that I didn't like the Lubuntu's GRUB nor the Sparky7.0, so I stayed with Sparky6.7.

See here how they all share the /boot/efi
Here I was installing Lubuntu.


Testing it all before the final installation.

You can use VirtualBox and create one VM with "EFI Bios". That will give you a similar setup that the distros will find on the real hardware.

One by one, install the distros you want on the same VM and verify they all share the /boot/efi and appear on the GRUB menu.

Take notes of how much space you will need/want for them for "/" and for "/boot/efi"

For example, Lubuntu used 4MB of /boot/efi and Sparky used 16MB. However Lubuntu recommends 300MB (for future updates/kernels I guess).


Comparison Windows11 vs Linux.
It is soooo different.

Windows11 was already using ~160GB of the hard drive, the CPU was busy when I was doing nothing and the RAM usage (right after booting up) was ~7GB. I know you can improve that, but ... didn't want to waste my time.

Linux. Some of those distros used 3.5 - 6.5 GB of disk,  RAM ~ 260MB , and the CPU utilization (already browsing the web and several apps open) was 0.03 %  The chassis is as cold as it can be, while on Windows it was quite hot. I always say "I want the machine for me, not for the OS".


I hope it helps you.

Final Notes:
- Read about EFI/UEFI if you didn't know it.
- Don't be afraid of touching the BIOS too much. You can revert all the changes. Just keep track of what you change and the effects.
- If a usb-stick doesn't boot up no matter what you set on the BIOS, try to boot from it on another machine or on a VM, maybe it wasn't well written.
- Secure boot ... if you don't need it, don't use it.
- Test and test with VirtualBox / Vmware or whatever you want to use.

17 February 2023

Compacting your VirtualDisk in VirtualBox VM


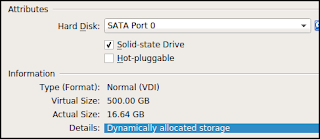
If you selected a "Dynamically allocated storage" after some use, you may want to reclaim "unused space" and make the vdi disk smaller.

-------------------------------
1. Make sure it is "dynamic"


-------------------------------
2. Verify that the VM configuration file has   discard="true" on the disk's details.

<AttachedDevice nonrotational="true" discard="true" type="HardDisk" hotpluggable="false" port="0" device="0">

If that is not there, when you run the command below you will get

# fstrim  -v  /
fstrim: /:
the discard operation is not supported

You can add it manually with a text editor when the VM (and maybe VirtualBox too) are powered-off and closed.

There are other methods to add it via VirtualBox commands if you don't feel like editing it.


-------------------------------
3. Power on the VM and run as root (Debian linux VM here)

# fstrim  -v -a
/home: 261.7 GiB (280975212544 bytes) trimmed on /dev/sda4
/boot: 875.7 MiB (918228992 bytes) trimmed on /dev/sda2
/: 213 GiB (228729548800 bytes) trimmed on /dev/sda1

-------------------------------
4. Power off the VM (may not be necessary but I rather don't risk it).
Open a command window on the location of the VM and run

# VBoxManage modifyhd -compact Debian_11_Server_64bit.vdi
0%...10%...20%...30%...40%...50%...60%...70%...80%...90%...100%


Too Cool for Internet Explorer